To work on any of the SCE projects, clone this repository and run
python3 sce.py setup.
This will clone and setup Core-v4 and
SCE-discord-bot,
as well as allow the command sce to be ran from the terminal.
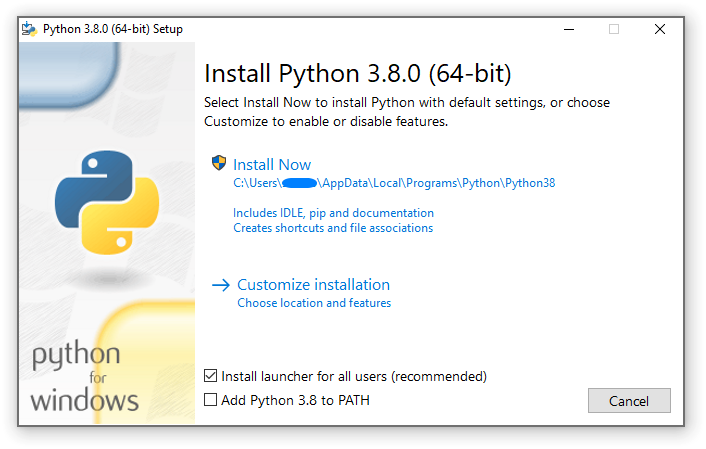
Before starting, ensure you have python3 installed and the launcher option was selected at the time of setup (check the second to bottom box!):
Note: You may get an error asking you to install the Visual Studio build tools. A link to download is here.
Afterwards, ensure you have the launcher installed by running this in your terminal:
py --versionYou should not get an error but instead the version given to you e.g. Python 3.X.X
You can now setup the tool with
py sce.py setup
For windows users, you will be prompted to add this to your path for the sce command.
To do this open your control panel and search "path":
Select Edit environment variables for your account. You should
be taken to the below view where you should paste the path (see bottom
entry in below screenshot).
You should now be good to go! Reload your VS Code window and open a
new terminal. The command sce should work now.
Ensure you have python3 installed!
Then, simply run
python3 sce.py setupAfter reloading your terminal, the sce command should work.
This tool runs presubmit checks for a project. For example:
# To run tests on all projects
sce presubmit -p <project name>
Available project names are Core-v4, SCE-discord-bot and dev. So to run
presubmit checks for Core-v4, we would do:
sce presubmit -p Core-v4This command will run a number of services for development. For example:
sce run -s <service name>Available service names are:
frontend: core-v4 frontendserver: core-4 backend serverdiscord: discord bot projectcore-v4: core-v4 projectmongo: mongodb on port 27017
Note: you can run multiple services at once e.g.
# runs the discord bot and core-v4 backend
sce run -s discord server
If you wanted to run everything at once, do:
sce run