eNose - Smell Detection Using BME688 and My Own AI Model (Built Using Jupyter notebook and scikit-learn)
Today, I am building an Electronic Nose (eNose) that can detect and identify different smells: air, alcohol and coffee although it can also be used for detecting food spoilage, combustible/ flammable/toxic gases, air quality and many more use cases.
This project is different from most other similar projects based on the BME688 in that I am not using the BME AI-Studio to train my AI model. Instead, I am using Jupyter notebook and scikit-learn to train my own model.
The eNose hardware consists of the Bosch BME688 Evaluation Kit and the Adafruit HUZZAH32 – ESP32 Feather Board (pre-soldered).
According to Bosch:
...The BME688 is the first gas sensor with Artificial Intelligence (AI) and integrated high-linearity and high-accuracy pressure, humidity and temperature sensors...
More information on the BME688
More information on the Adafruit HUZZAH32
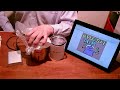
The image below shows the 2 components snapped together during use. There is an array of 8 BME688 sesnors on the evaluation board.
Bosch provides Arduino-based firmware examples and the BME AI-Studio for training AI models to identify different smells. You can collect your training data and save it on a SD card by using the sample firmware.The BME AI-Studio is proprietary software which allows you to train your AI model based on the training data and generate a configuration file and a meta information file about the AI model in a JSON-like format which you put on a SD card and insert into the BME688 Evaluation Kit to run your model.
I am using neither the BME AI-Studio nor a SD card in this project after not getting the results I expected using the proprietary tools (likely due to my own faults). Instead, I developed my own firmware by enhancing a BSEC2 (Bosch Sensortech Ennvironmental Cluster 2) library example and trained my own AI model using Jupyter notebook and scikit-learn.
More information on the BSEC2 Library
The following diagram explains how it works:
The steps include:
-
The BME688 Evaluation Kit sends all 8 BME688 sensor readings (in json) to the MQTT's 'sensorData' topic every 3 seconds.
-
The Data Collector is a shell script that subscribes to the 'sensorData' topic, reformats the json and saves the data in a file for training the Jupyter notebook.
-
The Jupyter notebook uses the collected data files for air, alcohol and coffee to train an AI model (using the KNN algorithm) and assesses its accuracy. It then outputs the trained model and scaler as pickled files.
-
A Flask application uses the trained model and scaler (pickled files) to implement a REST API which accepts sensor data and returns a prediction on whether the smell is air, alcohol or coffee. The application has been containerised for deployment to either podman or MicroShift.
The image can be pull from quay.io:
podman pull quay.io/andyyuen/enose-api:1.0
-
The AI application is also a Flask application. It subscribes to the 'sensorData' topic and receives the sensor data.
-
It then uses the data to call the REST API to see what smell it returns. It implements thresholding and a voting system such that a single change does not change the prediction immediately. When it decides that there is a change, it notifies the UI it provides to the user to switch to an appropriate animated gif image.The gif image can be one of the following:
-
unknown (dog sniffing) - not sure what smell it is yet (doing thresholding)
-
air - it is air that it smells
- alcohol - it is alcohol that it smells
- coffee - it is coffee that it smells
Again, the application has been containerised for deployment to either podman or MicroShift.
The image can be pull from quay.io:
podman pull quay.io/andyyuen/enose-app:1.0
-
bsec2-mqtt - contains the Arduino firmware source code using Bosch's BSEC2 library to receive compensated sensor values from the sensor API, formats them to json and publishes the data to the 'sensorData' MQTT topic.
-
deployment - contains a shell scripts:
'eNosePodmanDeploy.sh' to run the REST API and AI applications using podmand; and a yaml file for deployment to MicroShft.
'mqttPodmanDeploy.sh' starts a MQTT server which is a central piece of infrastructure to make the eNose application work.
And a number of yaml files for deployment to MicroShift and OpenShift. See Section 6 for details. -
enose-api - contains the REST API Flask source code and a Dockerfile for creating a container image.
-
enose-app - contains the Flask-based AI application which subscribes to the 'sensorData' topic to receive the sensor data, invokes the REST API with the data to get the smell prediction. It also provides a simple UI that shows the smell detected via animated gifs, and a Dockerfile for creating a container image.
-
images - contains images used in the README.md file.
-
notebook - contains the Jupyter notebook for training an AI model to distinguish different smells: air, alcohol and coffee. It has a sub-folder 'enose-data' which contains the training data files: air.json, alcohol.json and coffee.json (created by the saveMqttDataToFile.sh shell script) and a CSV file combining data from all 3 files (created by the Jupyter notebook).
-
scripts - contains the shell scripts:
'saveMqttDataToFile.sh' receives data from the 'sensorData' topic, reformats them into proper json and saves them on file.
'cycleThroughSmells.sh' lets you cycle through all the different smells in the enose-app UI by sending MQTT messages, for testing purposes only.
For setup of the Arduino environment for firmware development and deployment, please follow the instruction in this link.
Libraries used:
- BSEC2 Software Library at version 1.5.2400
- Wire at version 2.0.0
- SPI at version 2.0.0
- BME68x Sensor library at version 1.1.40407
- PubSubClient at version 2.8
- WiFi at version 2.0.0
Please also note that the BME688 Evaluation Kit requires at least a 24 hour burn-in period before first use.
-
Plug in the BME688 Evaluation Kit to your USB port
-
Bring up the Arduino IDE, open the 'bsec2-mqtt' sketch and change "myssid", "mypassword" and "192.168.1.100" in file 'bsec2-mqtt.ino'to match your environment. This assumes that you have already set up the Arduino configuration as per the instructions in Section 4.
const char* ssid = "myssid";
const char* password = "mypassword";

// MQTT parameters
const char* mqttServer = "192.168.1.100";
- Click Sketch-Upload to compile/upload the firmware to your BME688 Evaluation Kit.
Please note that the trained model and scaler are already in the enose-api directory. Also, container images have already been created and available on quay.io. You may want to try them out following the instructions in Section 6 first.
It is possible that each BME Evaluation Kit may consist of sensors with different drift and aging characteristics. If the containerised version does not work for you, then you have to train the AI model yourself using your own training data.
Please note that you will have to install the mosquitto Broker from your Linux repo; not that we need to run the Broker baremetal or in a VM but to get the mosquitto utilities: mosquitto_pub and mosquitto_sub for publishing and subscribing to MQTT messages.
-
Start the MQTT server (see instructions in Section 6).
-
Plug the BME688 Evaluation Kit with updated frimwarein to a USB port or a power source.
-
Run command to collect air samples which takes around 30 minutes to collection 600 samples and stops:
# Assuming you are in the eNose directory
cd scripts
./saveMqttDataToFile.sh mqttServerIP mqttServerPort air.json
- Put the BME688 Evaluation Kit in a container with alcohol and run command:
./saveMqttDataToFile.sh mqttServerIP mqttServerPort alcohol.json
- Put the BME688 Evaluation Kit in a container with coffee and run command:
./saveMqttDataToFile.sh mqttServerIP mqttServerPort coffee.json
- You will see 3 files air.json, alcohol.json and coffee.json in your current directory. Upload them to a sub-folder named 'enose-data' under the directory where your Jupyter notebook is located. Create the directory if not present.
-
Upload the Jupyter notebook eNoseTraining-psec2.ipynb to your Jupyter environment if not already done so.
-
Click Run->Run All Cells
You will see a couple of interesting graphs among other things, for example:
Confusion Matrix
The Confusion Matrix looks too good to be true. Usually when that happens, it points to overfitting. However when you look at the Classification Boundary graph, you will notice that the data for the 3 smells are separated cleanly without overlap. This may explain the good result.
You will find 2 pickled files in your Jupyter directory: enoseModel.pkl* and enoseSc.pkl. Copy them to the enose-api directory and build a container images by running the commands:
# Assuming you are in the eNose directory
cd enose-api
podman build -t enose-api:1.0 .
podman images
The will build a container image:
localhost/enose-api
Now you have to change the image name for enose-api in enosePodmanDeploy.sh to point to your image ie, localhost/enose-api.
If you need to deploy in MicroShift, your have to push your enose-api image to a publicly accessible repositoy such as quay.io (free to sign up) and modify the enoseDeployment.yaml image to point to your publicly accessible image before deployment.
- Start the MQTT server
# Assuming you are going to run all containers on your laptop using podman
# and you are in the eNose directory
cd deployment
./mqttPodmanDeploy.sh
-
Power up the BME688 Evaluation Kit
-
Start the REST API and AI application
# Usage: ./eNosePodmanDeploy.sh mqttServerIP mqttServerPort
./eNosePodmanDeploy.sh 192.168.1.153 1883

# where 192.168.1.153 is my MQTT server IP address and 1883 is my MQTT Server port
# You need to change them to match your environment
-
Point your browser to http://localhost:7005 to see the sniffing dog.
-
Put the BME688 Evaluation Kit in jars with different smells and see the UI switch to the animated gif for the smell. Please note that every time you switch to a different jar, it may take 10 to 20 seconds to detect the new smell. So be patient.
Only the steps that are different from Section 6.1 'Deployment using Podman' are shown below:
- Start the MQTT server
# Assuming you are in the eNose directory
cd deployment

kubectl create ns mqtt
kubectl create -f mqttDeploy.yaml -n mqtt
- Start the REST API and AI application
kubectl create ns enose
kubectl create enoseDeploy.yaml -n enose
the enoseDeploy.yaml references the MQTT server from within MicroShift using 'mqtt-pod.mqtt.svc.cluster.local' as the MQTT_SERVER_IP.
  - env:
    - name: MQTT_SERVER_IP
      value: mqtt-pod.mqtt.svc.cluster.local
    - name: MQTT_SERVER_PORT
      value: "1883"
- Point your browser to http://microshiftServerIP:30705 to see the sniffing dog.
Again, only the steps that are different from Section 6.1 'Deployment using Podman' are shown below:
- Start the MQTT server
# Assuming you are in the eNose directory
cd deployment

oc new-project mqtt
oc create -f mqttDeploy-loadBalancer.yaml -n mqtt
- Start the REST API and AI application
oc new-project enose
oc create enoseDeploy-loadBalancer.yaml -n enose
the enoseDeploy.yaml references the MQTT server from within MicroShift using 'mqtt-pod.mqtt.svc.cluster.local' as the MQTT_SERVER_IP.
  - env:
    - name: MQTT_SERVER_IP
      value: mqtt-pod.mqtt.svc.cluster.local
    - name: MQTT_SERVER_PORT
      value: "1883"
In public cloud, it is not that easy to access the nodeports due to difficulty in accessing a worker node's external IP. An easier way is to use a load balancer provided by the cloud vendor. This is the info displayed for the mqtt-pod and enose services.
oc get svc -n mqtt
NAME                TYPE           CLUSTER-IP      EXTERNAL-IP                                                               PORT(S)
mqtt-pod            LoadBalancer   172.30.78.154   a1b99bba2453448e799780f15786331d-1806257633.us-east-2.elb.amazonaws.com   1883:31883/TCP                        3h51m

oc get svc -n enose
NAME                TYPE           CLUSTER-IP      EXTERNAL-IP                                                               PORT(S)                               AGE
enose               LoadBalancer   172.30.204.14   a2ee3b53bed054a2cb74705cf5463942-912096501.us-east-2.elb.amazonaws.com    7000:30700/TCP,7005:30705/TCP         110m
You will see the external IP addresses of the load balancers, the long strings ending in 'us-east-2.elb.amazonaws.com.
- Point your browser to http://a2ee3b53bed054a2cb74705cf5463942-912096501.us-east-2.elb.amazonaws.com:7005 to see the sniffing dog.
Note: you have to substitute the external IP with yours in the command above.
Here is a sample message, consisting of all 8 sensor readings, sent to the 'sensorData' topic by the BME688 Evaluation Kit every 3 seconds.
{ "datapoints" : [
[ 0, 2869500, 28.459225, 1016.180603, 34.376034, 120413.921875 ],
[ 1, 2869556, 28.517452, 1016.351135, 34.103622, 110942.578125 ],
[ 2, 2869611, 28.915897, 1016.183594, 33.742943, 89229.695312 ],
[ 3, 2869666, 29.000937, 1016.153625, 33.607368, 104553.804688 ],
[ 4, 2869721, 29.528896, 1016.609131, 33.937214, 86428.085938 ],
[ 5, 2869776, 29.515783, 1016.538391, 33.476357, 101085.882812 ],
[ 6, 2869831, 29.242722, 1016.561462, 33.770340, 53962.902344 ],
[ 7, 2869887, 29.384720, 1016.526855, 33.223034, 84044.648438 ]
] }
The columns represent: sensor_id, time, temperature, pressure, humidity, gas_resistance, in that order.