Quick generic terraform startup + Guide with modules for appService, sql database, storage and reddis.
These instructions will get you a copy of the terraform starter project up and running on your local machine for additional development/modifications, setup with Azure via Service Principal and remote storage.
-
Azure Account and subscription
-
Install terraform and add to PATH variable following the official guide https://www.terraform.io/downloads.html
-
- Verify terraform is added to the path variable by running the command on a terminal
$ terraform -help
Usage: terraform [-version] [-help] <command> [args]

The available commands for execution are listed below.
The most common, useful commands are shown first, followed by
less common or more advanced commands. If you're just getting
started with Terraform, stick with the common commands. For the
other commands, please read the help and docs before usage.
##...
Terraform requires a Service Principal Id with contributor role to manage infrastructure on your azure account.
This Service Principal, creation and management can be automated using the Azure CLI. Azure Cloud Shell is a shell or terminal you can access from the Azure portal itself, so it's the most convenientif you have access to the Azure Portal since everything you need is preinstalled, and Cloud Shell automatically uses the credentials of the signed-in Azure user.
Open an azure cloud-shell with the indicated button, and you will get a terminal window inside the browser

If it's the first time, you might get prompted to create a storage account for cloud-shell to use.
Next, run the command to create a service principal with password. (Replace the placeholder with the principal name you want.)
IMPORTANT NOTE: This requires Application Administration priviliges, if you don't have those with your user, someone with proper access needs to create this for you either in Azure Portal or in Azure Cloud Shell; More info here: https://docs.microsoft.com/en-us/azure/active-directory/develop/howto-create-service-principal-portal
az ad sp create-for-rbac --name <service-principal-name>
Once created, you will get an output json like this:
{
  "appId": "<service-principal-ID>",
  "displayName": "<service-principal-name>",
  "name": "http://<service-principal-name>",
  "password": "<service-principal-secred>",
  "tenant": "<tenant-id>"
}
Now, we need to assign a role to this principal (so that it can create/manage resources in the Azure cloud). Follow the guide below to assign a role to the principal.
https://learn.microsoft.com/en-us/azure/role-based-access-control/role-assignments-cli
- Recommended for simplicity, assign Contributor role over the whole subscription, using the follownig command:
az role assignment create --assignee <PrincipalId> --role "Contributor" --scope "/subscriptions/<SubscriptionId>"
copy Service Principal app_id into client_id, password into client_secret, tenant and the azure subscription ID in the corresponding variables.
IMPORTANT: Do this in 2 places, terraform.tfvars and /state-storage/terraform.tfvars.
# ~~~~~~~~~~~~~~~~~~~~~~~~~~~~~~~~~~~~~~~~~~~~~~~~~~~~~~~~~~~~~~~~~~~~~~~~~~~~~~~~~~~~~~~~~~~~~~~~~~~~~~~~~~~~~~~~~~~~~
# TERRAFORM VARIABLES
# ~~~~~~~~~~~~~~~~~~~~~~~~~~~~~~~~~~~~~~~~~~~~~~~~~~~~~~~~~~~~~~~~~~~~~~~~~~~~~~~~~~~~~~~~~~~~~~~~~~~~~~~~~~~~~~~~~~~~~
subscription_id               = "[CONFIGURE THIS VARIABLE]"
tenant                        = "[CONFIGURE THIS VARIABLE]"
client_id                     = "[CONFIGURE THIS VARIABLE]"
client_secret                 = "[CONFIGURE THIS VARIABLE]"
Make sure to also fill Subscription_id and tenant, of your Azure subscription.
SubscriptionId is here:
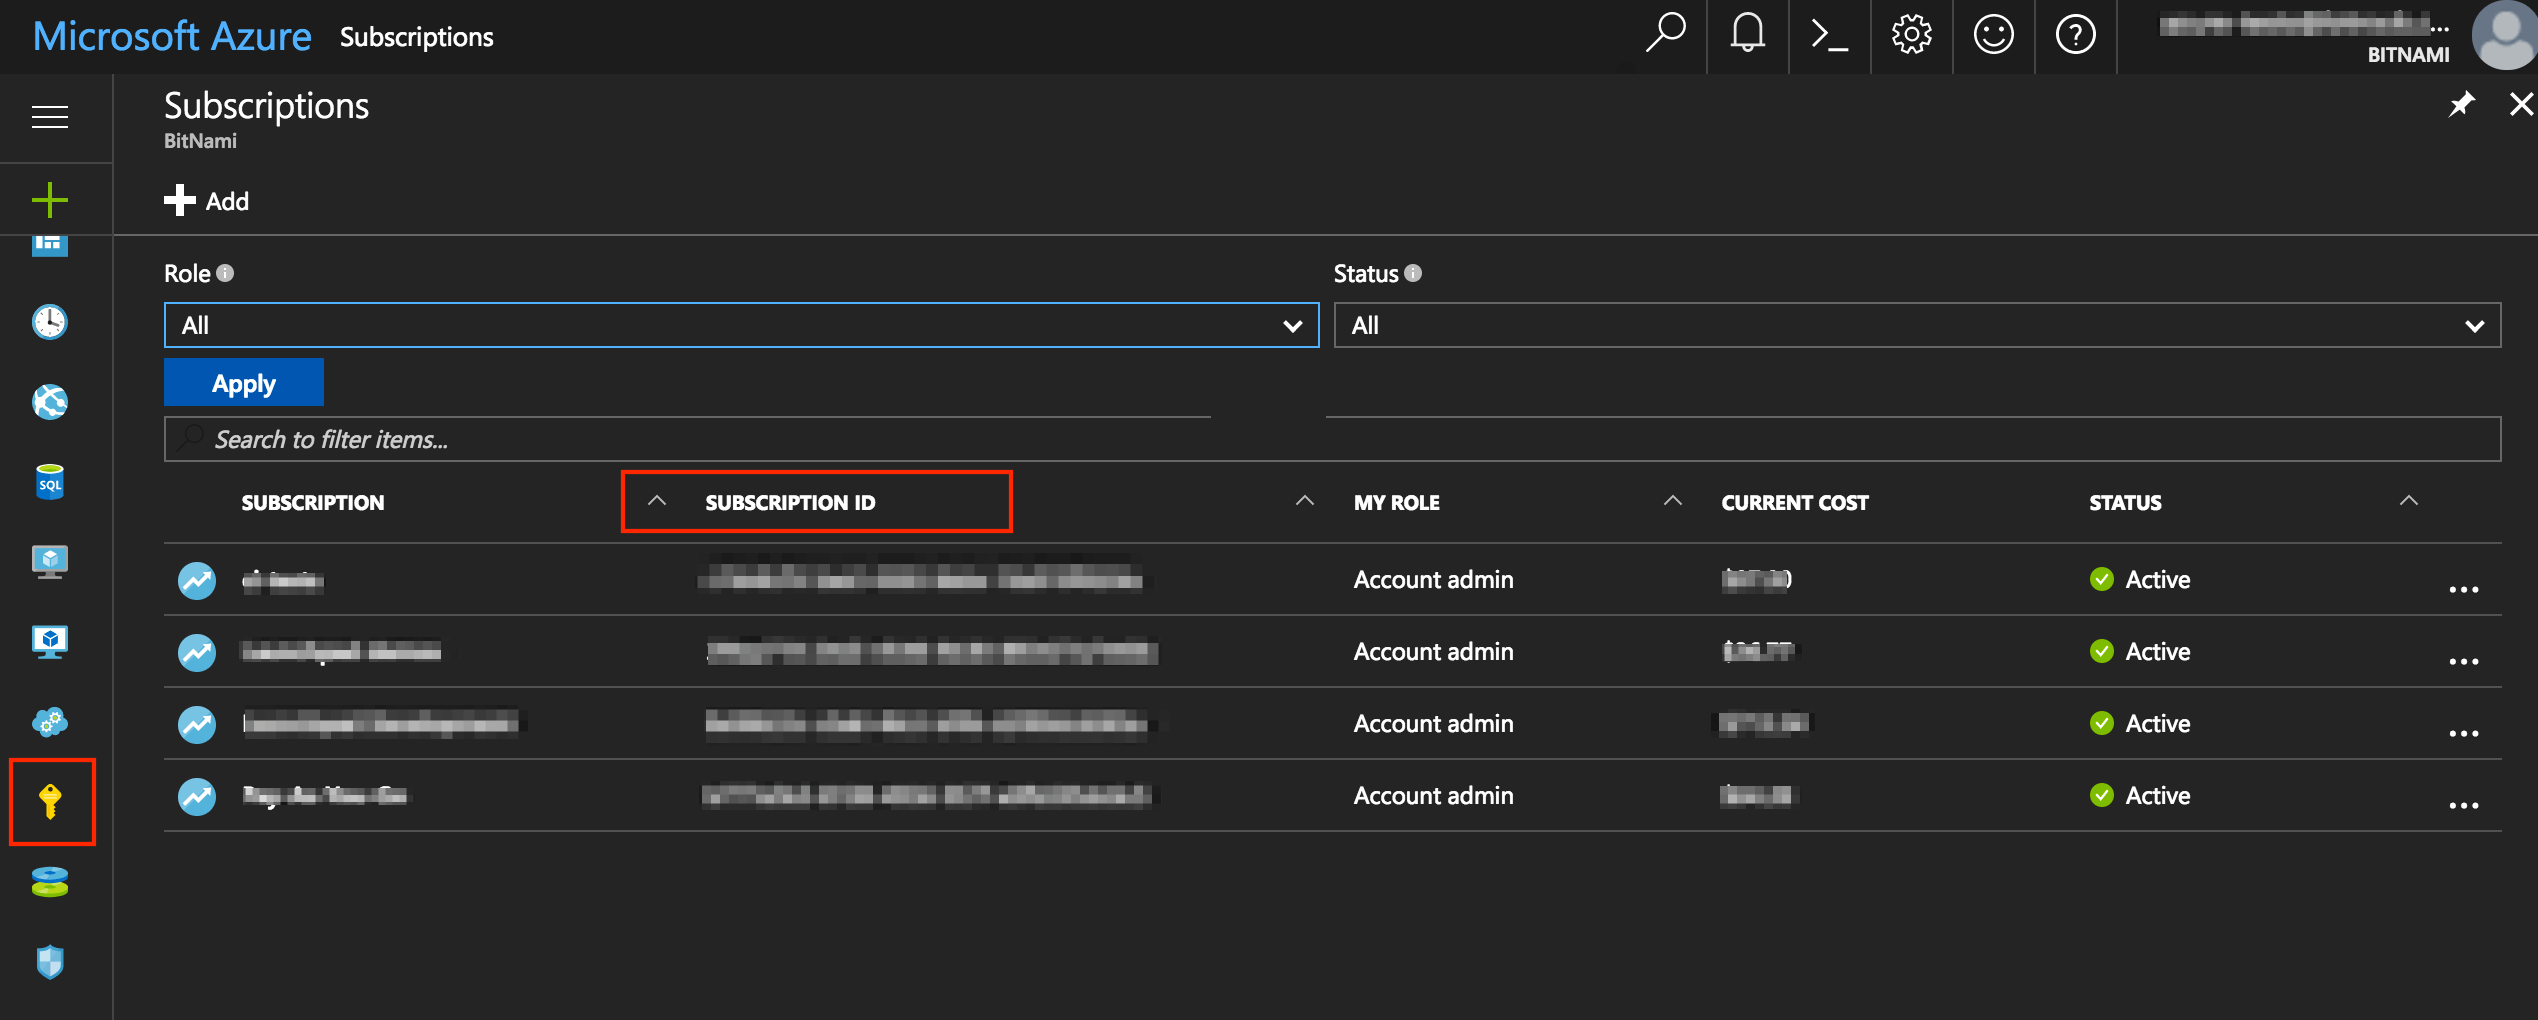
Tenant is here:

Terraform stores state files to compare against your cloud environment when executing plans. The safest way to store state is remotely (in a storage account) to avoid conflicts if more than one developer is making changes on terraform plans. This part of the guide, we'll create the storage with the already included terraform script, and configure terraform to use it for remotely storing state.
Now that terraform variables are configured with our Service Principal and has access to azure, we'll run our first terraform script to create the storage account for terramform remote state.
First of all, clone the repo and open in visual studio code.
RECOMMENDED: Install Terraform extensions to get intellisense and terraform syntax highlighting.
In VS Code Terminal, change to state-storage directory
cd state-storage
Now initialize terraform.
terraform init
Plan execution for creation of the storage account
terraform plan
Output should show 3 resources to create, 0 to change, 0 to destroy
Apply the plan
terraform apply
The script will print the following output which includes the SAS token for accessing this storage account.
Apply complete! Resources: 3 added, 0 changed, 0 destroyed.

Outputs:

resource_group_name = terraform-resources
sas_token = <your-SAS-TOKEN>
storage_name = terraformstorage
Copy and paste in the sas_token variable of the /backend.tf file.
# ~~~~~~~~~~~~~~~~~~~~~~~~~~~~~~~~~~~~~~~~~~~~~~~~~~~~~~~~~~~~~~~~~~~~~~~~~~~~~~~~~~~~~~~~~~~~~~~~~~~~~~~~~~~~~~~~~~~~~
# BACKEND CONFIG
# ~~~~~~~~~~~~~~~~~~~~~~~~~~~~~~~~~~~~~~~~~~~~~
5FE4
~~~~~~~~~~~~~~~~~~~~~~~~~~~~~~~~~~~~~~~~~~~~~~~~~~~~~~~~~~~~~~~~~~~~~~~~
terraform {
  backend "azurerm" {
    storage_account_name = "terraformstoragemrpw"
    container_name       = "terraform-state"
    key                  = "terraform.tfstate"
    sas_token            = "[PASTE SAS TOKEN HERE]"
  }
}
IMPORTANT: Also verify the variables storage_account_name, container_name and key have the correct values for the storage you just created.
Now that terraform has a configured backend and a token to access it, move to the root directory (where backend.tf is) and run terraform init.
cd ..
terraform init
Terraform is now fully configured with remote state storage and you can now make the necessary changes to main.tf, and terraform plan / apply as needed.
- Terraform - The web framework used
- Victor Flores - Initial template
- Fede Gepp - General Improvements, generic appsettings, add reddis, add storage.
- Victor Flores - 04/03/2021 - Add modules for: FunctionApp, CosmosDB SQL DB, CosmosDB Container, Azure Service Bus and Service Bus Topic.