Code for a GUI monitoring and an RF Ablation device in operation. Python GUI built on Tkinter/Matplotlib.
Example of the GUI.
Clone the project:
git clone https://github.com/cgrundman/rf-ablation-monitorGo to the project directory:
cd local/path/rf-ablation-monitorIn the terminal:
python main.pyCardiac Arrhythmia is a condition where the heart beat takes an irregular step. It is caused by fatty tissue present in the heart.
Heart beats are triggered by electrical signal from the sinus nerve. The signal travels through the heart and triggers contractions in the different chamber of the heart to pump blood through the body.
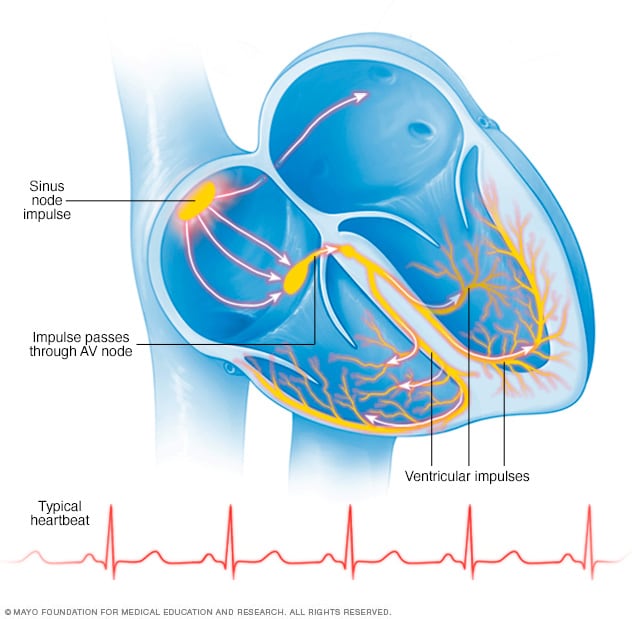
The signal originates from the Sinus node. From the sinus node, it travels through the Atrium (causing the Atriums to contract) to the Atrioventricular (AV) Node. The signal then continues through the vetricals causing contraction there. From here the signal travels back towards the Atriums, where there is a refractory period in the heart muscle preventing the signal from activating another contraction before dissipation.
The heartbeat can be further visualized by an ECG. PQ is contraction and relaxation of atriums, QRS is the contraction of the ventricals, and ST represents relaxation of the ventrical.

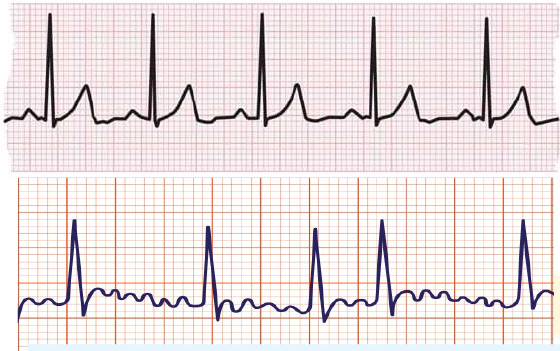
However when there is sufficient fatty tissue, the impedence of the tissue rises and delays signal propagation. If the delay lasts longer than the refractory period, the signal triggers another contraction of the ventricals. The ECG then shows another ventrical contraction after the first. The following image shows a normal heartbeat above, and a heartbeat with arrhythmia lies below.
RF Ablation is one of the treatments for this condition. It is not the first option as it is an invasive procedure. The idea is to use a radio-frequency signal to generate heat. The heat is then applied to the heart tissue causing a lesion. Lesioned tissue has a lower impedance, thus hopefully the arrhythmia is cured. An image of the operation can be seen below:

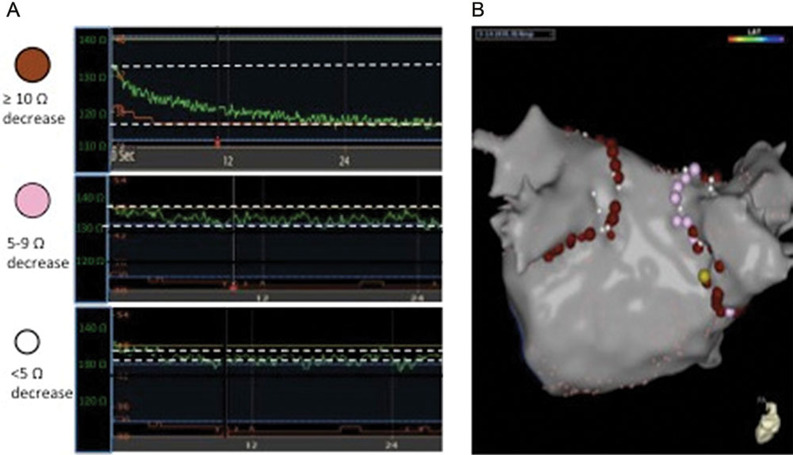
The ablation electrode is inserted into the femoral vein in the leg and fed through the vein into the heart. There the controls are used for fine control and placement of the electrode. Modern imaging technology allow for path planning of the surgery beforehand. Here is an example of a typical ablation path:
The relationship between impedence of the tissue and the temperature of the electrode is complex. Therefore the temperature of the electrode and the impedence of the system (electrode and tissue) are always monitored. This gui is an example of a monitor and interface for rf-ablation.
The GUI simlates temperature and impedence values and plots the values on screen. Various settings can be adjusted to and tweeked for control of the procedue. The GUI is as seen below:
The GUI is split into 3 main sections. On the far left, there is a monitor for the impedence and temperature values. There are also the thresholds for max value in red and warning areas in orange. For Impedence, the ideal values are shaded in green. The vlaues them selves are plotted in blue and 20 values are plotted at a time (this is a constraint of Matplotlib, as more produce lag in the function of the device) and displayed numerically above the plot.
The middle section displys and aloows for adjustment in the thresholds. There are buttons for increasing, decreasing, and resseting to default the threshold values. Unseen are the warning and Exceeded warnings above the threshold adjustments. If the values are in the orange regions in the plot, a warning message appears to warn the user. If the thresholds are exceeded, an exceeded message is displayed and the simulation is turned off.
On the right are the controls. On the bottom, the on/off button for the simlutation apears as a toggle switch, and the reset and close buttons are both for the entire of the GUI. Above are the buttons for ablation (turning the electrode on and off) and the reposition button (normally these are controls to physically move the device, however this is simply resetting values after movement would occur)
All buttons were programed with svg and converted to png graphics. TKinter is simply using the image as the button.
This repository is free to use under the terms of the Apache 2.0 License.